Plan Info
Plan Info
2.1.1. Basic Info
These details require fundamental information about the plan that the user will be creating.
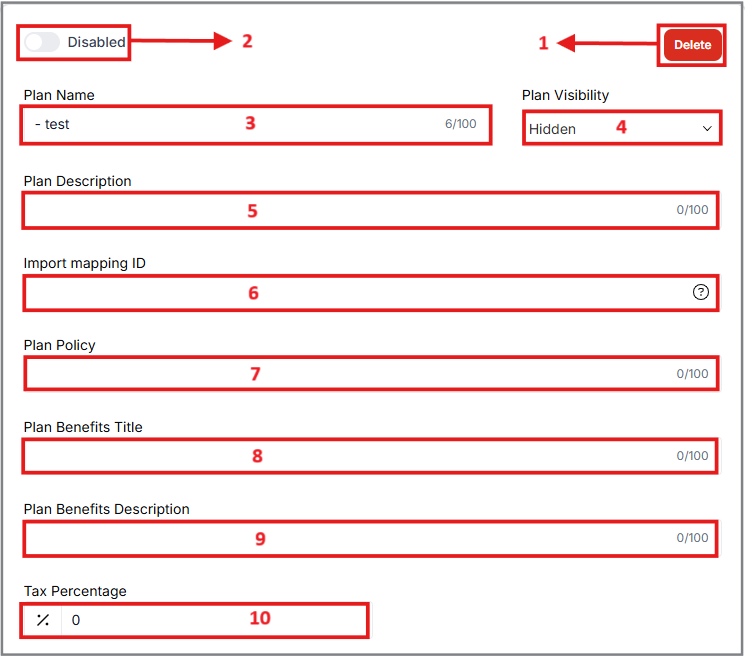
1. Delete an existing plan:
If the user needs to delete an existing plan, the option to do so will appear in the top right corner of this tab.
2. Enable/Disable:
This radio button lets the user choose whether to enable or disable the membership plan. To enable the plan the user can turn on the radio button.
3. Plan Name:
The Name of the Membership plan will be displayed to the Public after the User names it.
4. Plan Visibility:
The user is free to choose whether his membership plans will be visible to the public or will stay hidden.
5. Plan Description:
A brief description of the plan is required here to inform the general public about its details.
6. Import mapping ID:
This ID is used for importing members from other systems and is equivalent to the ID in the system from which the User is importing.
7. Plan Policy:
The User has to specify the Policy of his plans which would be a set of guidelines or rules that outline how the plan should act in specific situations.
8. Plan Benefits Title:
It shows the title of the plan that has certain benefits.
9. Plan Benefits Description:
It shows the description of the plan with certain benefits.
10. Tax Percentage:
The user can specify the tax percentage to apply to the plan, and it will automatically calculate and display the benefits.
2.1.2. Plan Highlights
These Highlights summarize the key benefits of the User’s plan. They will be displayed in the plan preview where the user’s plan is showcased.
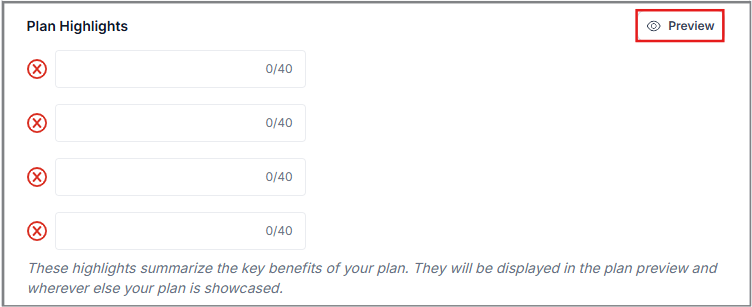
The Preview button provides a summary of the completed plan details, including the selected plan type, the plan name, and the associated amount.
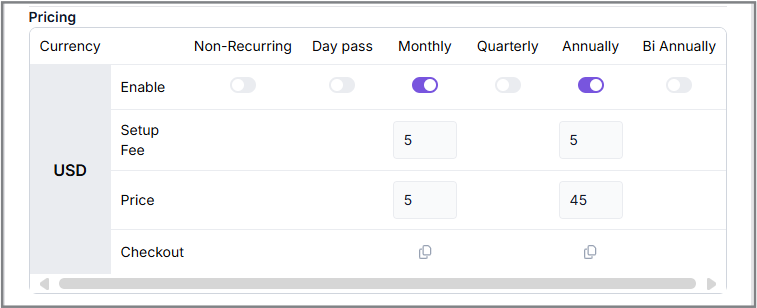
2.1.3. Pricing
Under Pricing, the user can configure the pricing aspect of his Membership plans.
-
Membership Plan Fees and Payment Process
Under this category, users can set the fees for various membership plans based on a predefined period.
Activating a Plan
To activate a plan, users must toggle the radio button to On. This action allows them to define the specific details of the plan, including:
- Setup Fee: The one-time fee associated with setting up the membership.
- Plan Price: The recurring cost of the membership.
Checkout Option
A Checkout option is provided, enabling users to proceed with payment for their selected plans. By clicking the Copy icon, users can copy the checkout URL. Pasting the URL into a new browser window redirects the user to the payment page, where they can complete the final steps of the membership payment process.
Payment Summary
On the payment page, users will see a summary of the payment details, including:
- Date and Time Stamp: The creation date and time of the membership.
- Membership Type: The category of the selected plan.
- Setup Fees: Displayed under the Additional Fees section, along with their respective time and date stamps.
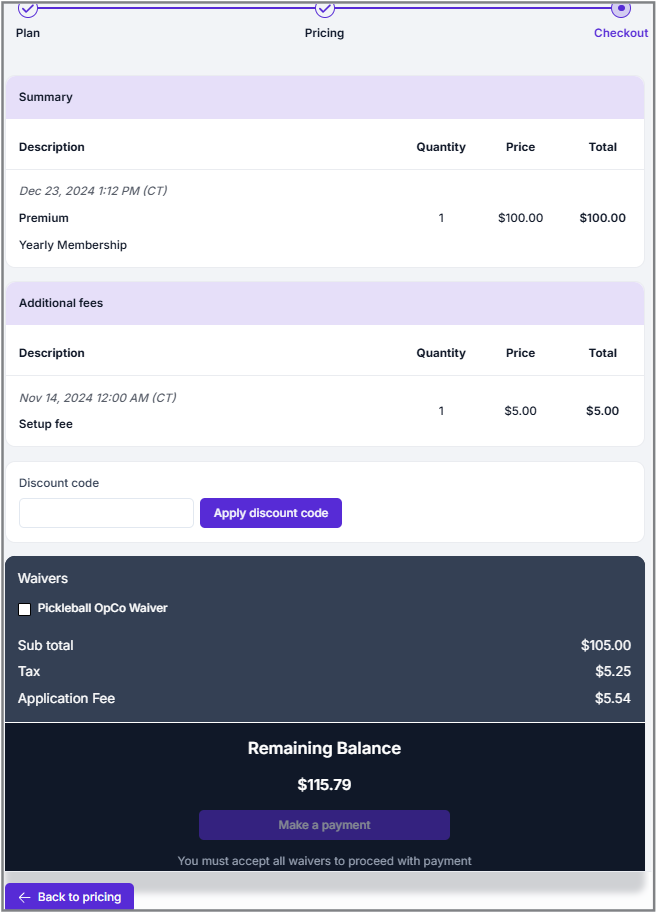
As users scroll down, they will see any previously added waivers and the total payment balance due.
- Discount Code: If users have a discount code, they can apply it to receive a discount on their total payment.
- Default Currency: All pricing details are displayed in USD by default.
2.1.4. Advanced Pricing Configuration
This section notifies the user about the benefits of certain plans that he is going to go with. There are many types of plans to go with which are specified for different periods, such as Plans that are:
- Non-Recurring
- Daily basis/ Day
- Monthly
- Quarterly
- Annually
- Bi-Annually
All of them have different kinds of features/benefits that might suit the User’s interests. Only plans that are Annually and Bi-Annually have the same kind of benefits.
Following are the descriptions of the benefits of different plans:
- All
- Non-Recurring
- Monthly
- Quarterly
- Annually
- Bi-Annually
This option displays all the available periods for the selected membership plans. By toggling the radio button, the selected period (e.g., monthly, quarterly, annually, bi-annually, etc.) will apply to all membership plans.
Additionally, there are a couple of specific radio buttons with conditions tailored to different membership plans.
(Radio Button) Limit Total Active Plans:
This feature allows users to set a maximum limit on the number of active members for a plan. Once the specified limit is reached, the plan will no longer be available for purchase or new sign-ups.
(Radio Button) Trial Plan:
Enabling this feature allows users to offer a free trial of the plan for a specified duration. The trial period can be set in days, providing potential members with a limited-time preview of the plan's benefits.
Non-recurring plans are one-time plans designed for specific occasions, such as campaigns or events. These plans are valid only once and do not renew after their initial use.
(Radio Button) Lifetime Plan
By enabling this radio button, the user will have a lifetime membership related to a non-recurring plan.
(Radio Button) Specify Start/End date
Each one-time plan can specify a start and end date. This is commonly used for Snowbird or holiday memberships.
By toggling this radio button to 'On,' an extended window will appear, prompting the user to specify a start and end date for the non-recurring plan. These dates define the duration during which the membership plan will be active, ensuring clarity on when it begins and ends.
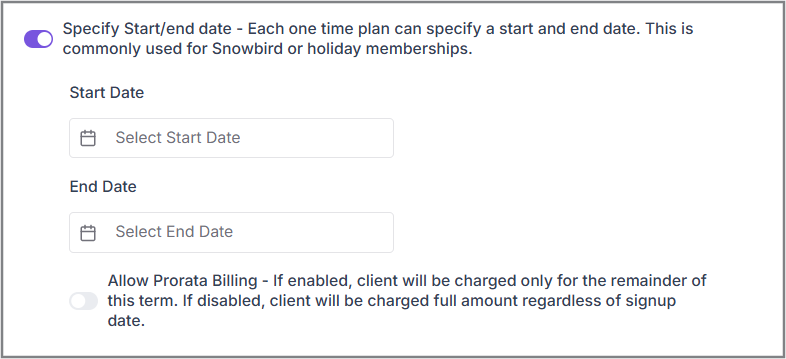
Another radio button will pop up relating to the Prorata billing.
Allow Prorata Billing
If enabled, the client will be charged only for the remaining portion of the current term. If disabled, the client will be charged the full amount regardless of their signup date.
(Radio Button)
The User must turn on this option to set a minimum number of billing cycles for the monthly payment plan. When it's enabled, the user will be billed for at least 'X' cycles. If it’s left off, billing will just keep going indefinitely.
For example, if you set the limit to 5 cycles, billing will stop after the 5th month, and no invoices will be created starting from the 6th month.
(Radio Button)- Prorata Billing
This option lets billing happen on a specific day each month, with a prorated charge for the first order. If enabled, all clients will be billed on the same day each month. If not, billing will follow the default system (e.g., June 15 to July 15, based on when the client signed up).
(Radio Button)
By enabling this option the user can define a minimum number of billing cycles for the quarterly payment plan. When activated, the user will be billed for at least 'X' cycles. If not enabled, billing will continue indefinitely. For example, if the limit is set to 5 cycles, no invoice will be generated starting from the 6th quarter.
(Radio Button)- Specify Billing Period
This feature allows the user to define a start and end date for an annual billing plan. For example, the user can set the billing period to run from January 1 to December 31. In this case, the user will bill for the entire annual period, regardless of when during the year a customer signs up.
This radio button allows the user to have the same specifications as the Annual Plan.
After selecting the preferred payment conditions for the different membership plans, the user must click the “Save” button to save their data and progress.